...
Data Source
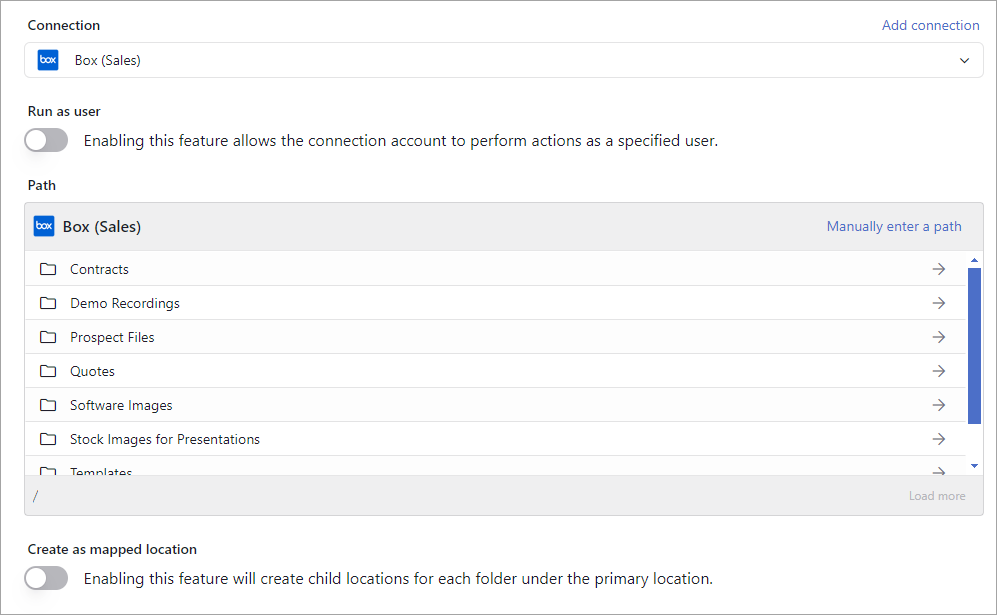
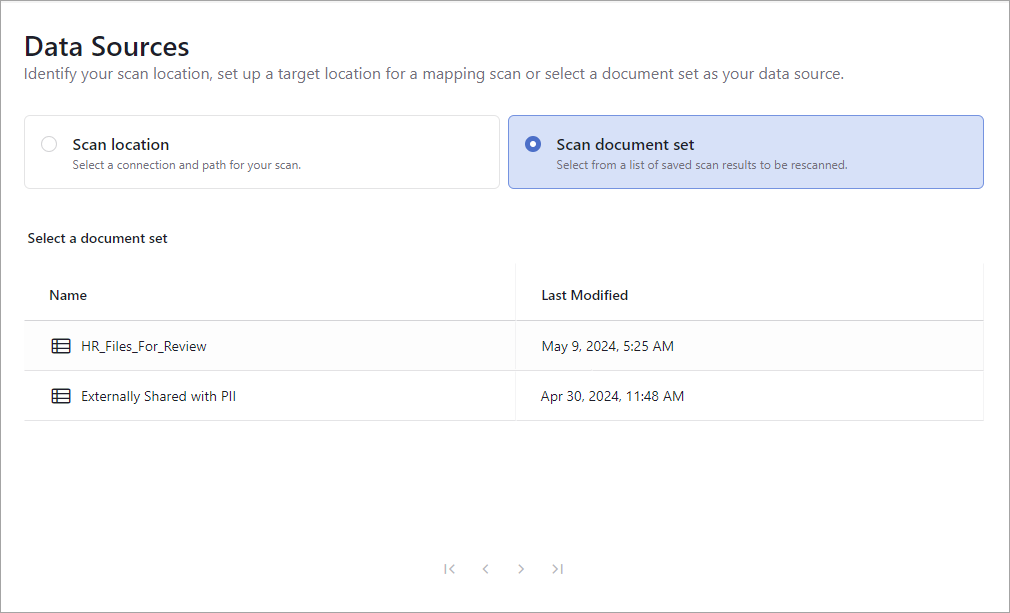
The first step is in the Discover Scan Setup is to select if you will be using a location or document set for the scan. A location allows you to select a connection and path to scan. A document set allows you to select a saved scan result to rescan. Expand the section below based on the option you want to select to view the instructions.
...
| Expand | ||
|---|---|---|
| ||
|
| Expand | ||
|---|---|---|
| ||
You can only assign a document set to one scan. Once assigned to a scan, you cannot edit the document set. Document sets that have been assigned to an intelligent migration will not be available in the list to select for use in a Discover scan. Document sets that have been assigned to an intelligent migration will not be available in the list to select to be used for a Discover scan
Info |
|
...
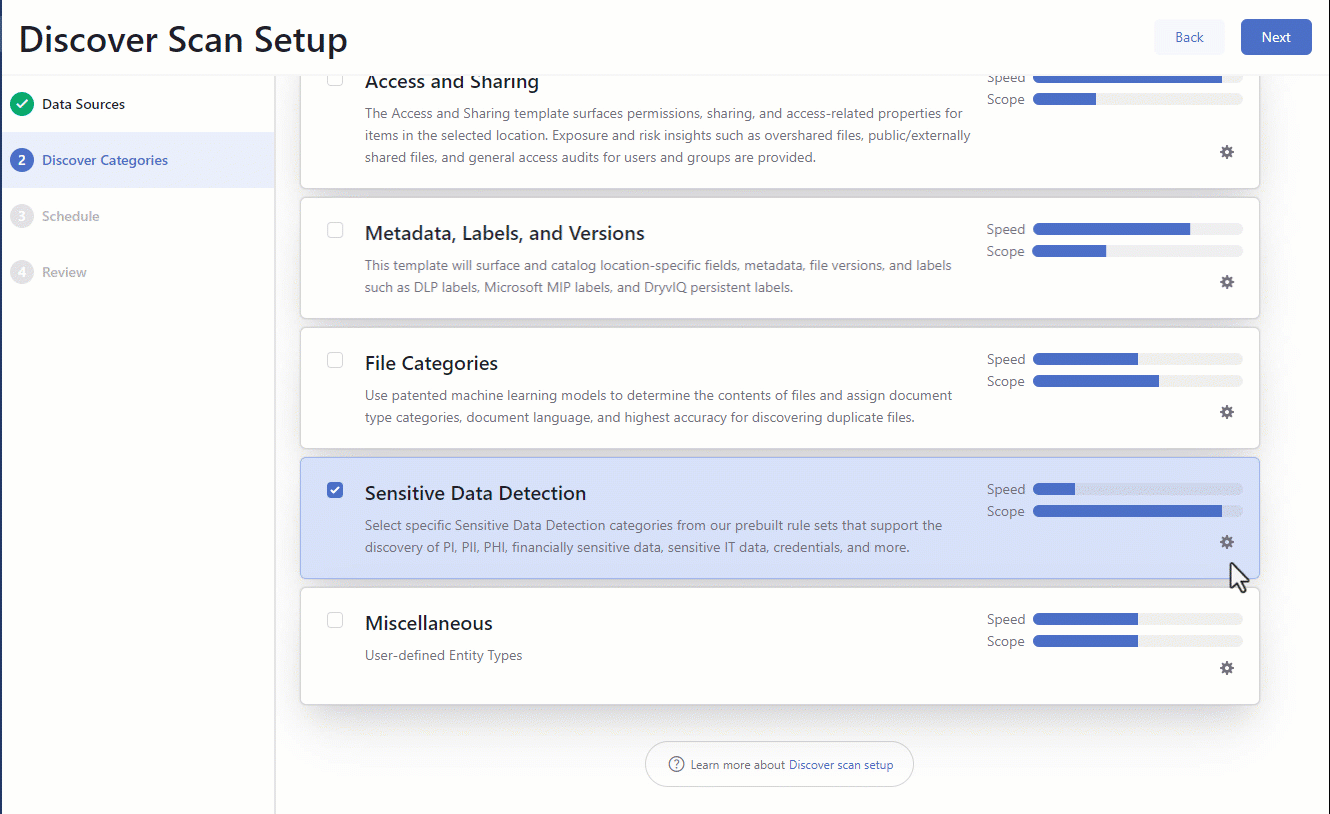
Discover Categories
This step allows you to select the standard templates you want to add to the Discover scan. For locations, File Inventory is always included in the Discover scan and cannot be turned off. However, you can choose to add additional categories to the scan to meet your needs. For document sets, File Inventory will not be included in the scan since all the items in the document set will already have been run against the File Inventory template, and scanning them against it again would be redundant.
...
| Info |
|---|
If a category is unavailable for selectingselection, the supporting entity type is not installed in your DryvIQ Platform. |
...
Click to select the box in front of the template name. A check mark appear appears in the box to indicate it is selected.
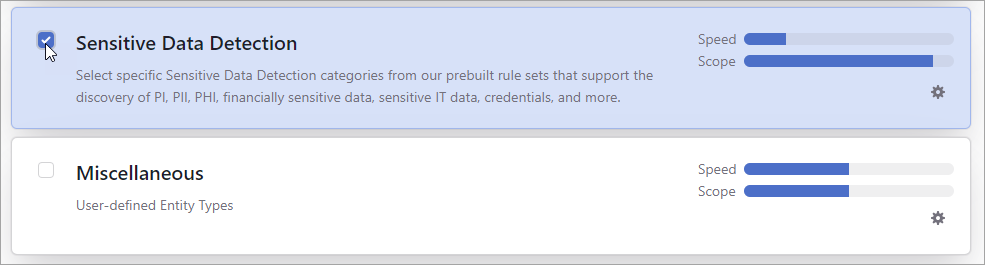
Selecting a template selects all available categories in that template. DryvIQ recommends leaving the default categories for each template. However, if your use case requires a specific set of categories, you can edit the template categories as needed. The exception is the File Inventory template, which cannot be edited. To edit a template, click the gear icon on the template card.
The corresponding modal opens and displays the categories for the selected template. Expand a category to view the included entity types. Clear the box for an entity type you do not want to include in the template.
Click OK when you are finished adjusting the categories.
Repeat steps 1-4 for each template you want to select.
Click Next to advance to the Schedule step.
If you selected select more than one template, you will receive a warning that selecting multiple templates may impact your scan speed. Click Cancel to edit your selections or OK to continue with the current selections.


...
Settings
The Settings step allows you to customize the scan by adding filters based on path, file type, files file size, etc. You can even specify how much of a file gets scanned and enable optical character recognition (OCR) if you want PDFs and images to be scanned for text. There are even advanced options to ignore hidden and shared items to improve scan results.
...
The Path Filters allow you to specify specific paths to exclude and patters patterns that should be included or excluded in the scan. These filters are only available for scans that use locations and are not available for scans that use document sets.
...
The Exclude folders filter allows you to specify folders under the selected data source to exclude from the scan. This is useful if you know there are folders in the selected data source that contain files that do not need to be scanned. For example, if you are performing a scan for sensitive content such as PII and have a folder that contains purchased stock images used for marketing purposes, you can choose to exclude that folder since the files would not need to be scanned. This improves scan performance and outcomes since there will be less fewer superfluous results to review.
...
You can clear an excluded folder selection by clicking the X on the box for the folder. AlternatelyAlternatively, you can click Clear to clear all the excluded folder selections.
...
This filter allows you to filter files and/or folders based on the name pattern. An asterisk can be used for exact matches or for , prefix, or suffix matches. For example, “*txt” would filter all .txt extensions. You can also use asterisks to surround a pattern to filter file and/or file folder names. For example, using “*test*” would filter all names that contain “test.”
...
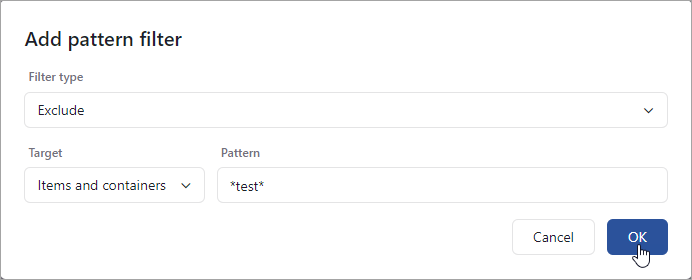
Adding a Pattern
Click Add. The Add patter pattern filter modal appears.
Use the Filter type list to select if you want to include or exclude the specified pattern.
Use the target list to select if the pattern applies to folders (containers), files (items), or both.
Type the pattern you want to use in the Pattern field.
Click OK.
Repeat these steps for each pattern you want to use for the scan.
...
You can remove a pattern by clicking the X on the pattern box. AlternatelyAlternatively, you can click Clear to remove all patterns.
...
File types
This filter allows you to filter specific file types. Select if you want to include or exclude the file type that will be selected in the next field. Then, select the file type you want to filter. You can select multiple file types if needed. The filter options are temporary files, executables, movies, audio files, images, documents, and Windows OS/DB files. Click a selected file type to clear the selection as needed. Click the down arrow on the list or anywhere outside of the list to close it.
...
Content Extraction refers to how content within a file is scanned to discover different entities. This setting determines the maximum number of bytes to scan per file. By default, the maximum number of bytes scanned is 1 MB. Increase or decrease the limit as preferred. Scans with a higher extraction limit scan a larger amount of text and provide a deeper scope but run slower. Scans with a lower extraction limit run faster but do not provide as deep of an analysis. This setting is only applicable when using templates that scan a file’s contents (File Categories, Sensitive Data Detection, and Miscellaneous templates).
...
Optical character recognition (OCR) allows DryvIQ to scan image files and PDF files for text. This is a useful setting if your company has a lot of scanned documents. Enabling OCR provides a deeper scope for a scan, but the scan will run slower. Scans without OCR enabled will run faster but do not provide analysis of text in image or PDF files.
Enabling OCR is only useful when using templates that scan a file’s contents (File Categories, Sensitive Data Detection, and Miscellaneous templates). All text processing is limited by the content extraction limit, so even when OCR is enabled, that limit applies. Also, applying filters that exclude scanning image and images or PDF files will make makes the OCR setting obsolete.
...
| Expand | ||
|---|---|---|
| ||
Starting onUse this field to specify a starting date for the scan; the first scan will not run until this date. This allows you to create a scan but not start the scan until a later date. This would be useful, for example, if you are adding multiple scans but want the scans to run in waves rather than all at once. You can add scans at the same time and just set different starting dates. You only need to add a date to this field if you want the scan to start running on a date later than the date you are creating the scan. Leave this field blank if you want the scan to start running immediately. This field can be used in combination with all other schedule fields. Scan onUse this field to specify which days of the week you want the scan to run. By default, all days are selected. You can clear days by clicking on a day in the list. The check mark in front of the day is removed, and the day no longer appears in the field above the list. Similarly, click on a day without a check mark to select the day to include it. Setting days can be useful in creating waves of scans since you can set the scans to run on alternating days, or it can be useful to set scans to run on days where activity is minimized (such as weekends). This field can be used in combination with all other schedule fields.  Scan everyBy default, the scan is set to run once a day. You can use this option to set the scan to run on at a different time interval. Specify the number and select if it is minutes, hours, or days. The time determines when the scan will run after the previous scan completes and not specific increments of time. For example, the default value is 1 day. This means the scan will run 24 hours after the previous scan completes. This option can be used in combination with the Starting on and Scan on fields. It cannot be used in combination with the At a specific time option. When you select this option, additional fields display that allow you to control the time frame for the scan as well as the number of times the scan will run per day.  First scan start timeUse this field to specify a start time for the first scan in the schedule. If a time is not specified, the first scan will start after midnight. Specify the time using the format HH:MM XM or click the clock icon to select the time. Scan stop timeUse this field to specify the time you want the last scan to start. If a time is not specified, the last scan run will start no later than midnight. Specify the time using the format HH:MM XM or click the clock icon to select the time. Maximum number of daily scansUse this field to specify the number of times you want the scan to run in a day. Once the scan runs this many times, it will not run again until the next day. At a specific timeUse this option to set the scan to run at a specific time of the day. This may be useful if you prefer scans to run only during off hours. This option can be used in combination with the Starting on and Run on fields. It cannot be used in combination with the Scan every option.  Scan atSpecify the time here using the format HH:MM XM or click the clock icon to select the time. The scan will run at that time for all the selected days. |
...
Type the name you want to assign the scan in the Name field and click Done to save the name.
For document sets, the selected document set will be renamed with the scan name entered here and will be locked from further editing. The new name will be displayed on the Document sets tab in the Results saved views.
The rest of the page displays the configurations selected for each step of the Discover Scan Setup. Review the information. If you want to change anything, click Edit next to the section heading (or click the heading in the menu on the left).

This will take you back to the corresponding page so you can make the necessary edits. Click Next to advance through the remaining setup pages or click Review in the left menu to return to the Review page.
Once you are finished reviewing the setup, save the scan.

If you selected a location for you your scan, you are presented with two options:
Save scan: This saves the scan with no further action. The scan will follow the schedule that has been set. If no schedule has been set, the scan must be triggered manually.
Note that the primary scan for mapped locations and document sets will run as soon as the scan is saved to create the child scans. However, the child scans will not run once the primary scan is complete. The child scans will run according to the schedule set for the scan. If no schedule has been set, the scans will need to be run manually.Save scan and run it now: This saves the scan and triggers the scan to run. Once complete, the scan will then follow the schedule that has been set for the scan. If no schedule has been set, subsequent scans must be triggered manually.
The scan is added to the All Scans page.
...