On This Page
| Table of Contents |
|---|
Overview
Discover results can return thousands of files depending on the makeup of your content. Filters allow you to narrow the results to show only items that meet specified criteria. The Filter pane displays all the available filters. You can open and close the pane by clicking Filter. Some of the available filters are automatically generated based on the content. Learn more about each filter type and how to apply filters below.
Understanding Filters
The Filter pane displays the available filters grouped by category. You can collapse and expand any filter section by selecting the accordion icon for the section. Use any combination of filters that meet your needs, but understand that selecting different filters affect the results differently. Selecting multiple filters from different filter categories works as an “AND” statement, so a file must include all selected entity filters in order to show in the filtered Results list. Selecting multiple filters from the same category may serve as an “AND” or an “OR” statement. Refer to each filter section below to learn more about each filter.
| Info |
|---|
the Included Entities, Locations, and Migration Plans filters list a maximum of 100 items. |
Included Entity Types
These filters are automatically generated based on entity types available in your DryvIQ Platform. There are three levels of information available available for selections. The top level are the Classify and Discover templates available when building your scans.
You can expand each template to view the categories under each template. This is the equivalent to using the gear icon when creating a Discover scan to view the included categories in each template. You can then view the individual entity types under each category.
For categories that include multiple entity types, you can chose to include the the entire category and all included entity types or just select entity types. Note that these filters works as an “AND” statement, so if you select a category that contains multiple entity types, a file must include all entity types within the category in order to show in the filtered Results list. Selected filters turn blue to indicate they have been selected. You can clear a filter by selecting it again. Note that the filters are not applied until you click Apply.
| Info |
|---|
The Included Entities filters will not display results for the Content Category, File Details, Location, and Tracking Information. |
Migration Plans
This filter allows you to view items that have been assigned to specific intelligent migration jobs. The Unassigned option displays only items that have not been assigned to an intelligent migration. This option is useful if you want to review unassigned items so you can add them to the appropriate intelligent migration job.
File Extensions
This section displays all the file extension types that are included in the results. The “Other” category includes extensions that don't exist in the content catalog. The number of files per extension is displayed for your reference. This filter serves as an “OR” statement, so the results will show all selected file extensions. Select the box for the extensions you want to include in the list. A check mark displays in the box to indicate the filter has been selected. Select the box again to clear the selection. Note that the filters are not applied until you click Apply.
Item Date Range
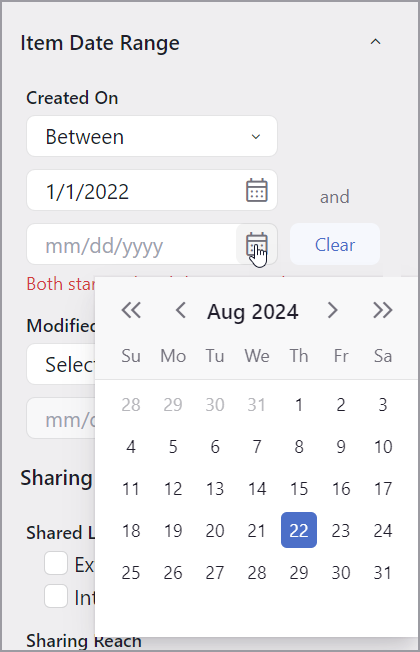
The section allows you to filter results based on the “created on” and/or “modified on” date. Date filters serve as an “AND” statement.
For the date you want to use as a filter, select the date mode you want to use. You have the option of selecting a date range (Between) or a specific date (On, After, or Before). If you chose to Between, you will see two date fields. Specify the start date for the range in the top field and specify the end date in the bottom field.
Use the date picker to select the date. Enter the date using the mm/dd/yyyy format, or use the calendar to select the date. Click the single arrows to move between the months and the double arrows to move between the years.
Sharing and Access Control
This section displays filter options based on the sharing permissions added to the items. This can help you identify content that needs to be reviewed or have sharing permissions adjusted. The sharing and access control filters serve as an “AND” statement.
Links
You have the option to filter the results based on how the content is shared. Links shared to users outside of your organization can be filtered by selecting External Anyone Link, and links shared to users within your organization can be filtered by selecting Internal Domain Link. Note that these filters can be used together.
Sharing Reach
The Overshared filter allows you to view files shared with a group that provides access to a potentially large audience. This is determined based on sharing options available per platform. The following group assignments are used to determine when a file is overshared.
Platform | Overshared Groups |
|---|---|
Network File System | Everyone |
Microsoft Office 365 | Everyone except external users |
Dropbox for Business | Everyone at <Organization Name> |
Box | No built-in groups are available that grant file/folder permissions. |
No built-in groups are available that grant file/folder permissions. |
Shared with Number of Users/Shared with Number of Groups
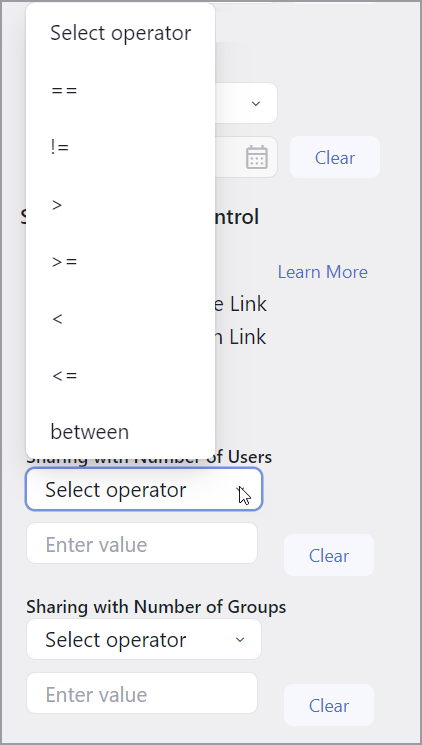
These sections allows you to filter content based on the number of users and/or the number of groups with whom the content has been shared. Select the operator you want to use and specify the number to use for the filter. See below for the available operators.
Operator | Description |
|---|---|
== | Equals: Include only content shared with the exact number of users/groups specified. |
!= | Not equal to: Include only content that is shared with less than or more than the specified number of users/groups. It will display all shared content that matches below or above the specified number. |
> | Greater than: Include only content shared with more than the specified number of users/groups. |
>= | Greater than or equal to: Include only content shared with the number of users/groups that is greater than or equal to the specified number. |
< | Less than: Include only content shared with less than the specified number of users/groups. |
<= | Less than or equal to: Include only content shared with the number of users/groups that is less than or equal to the specified number. |
between | Between: Include only content that is shared with the number of users/groups that fall between the specified numbers. You must specify two values for this operator. The first value sets the minimum value, and the second value sets the maximum value. |
Duplicate Data Identification
This section allows you to filter content based on the type of duplicate content that has been identified. Select one or multiple options based on the type of duplicate data you want to identify.
Potential Duplicates: This filter displays files that may potentially be duplicate files based on a file metadata signature. The metadata signature is a combination of file name and file size (in bytes).
Likely Duplicates: This filter displays files that are likely duplicates based on a content signature.
Identical Duplicates: This filter displays files that have identical file metadata and contents.
Filtering the Results
Click Filter to open the filters panel if it is not already open.
Select the filters you want to use.
Click Apply when you are finished choosing the filters.
The Results page will display only the files that meet the criteria for the selected filters.
Click the X on the filter to remove just that filter or click Reset to remove all filters.
| Info |
|---|
The screen displays a “No results found” message if no files match the applied filters. |


